Simplify Backend Development with Prisma

If you are a backend or a full-stack developer working in Node.js ecosystem, you probably have worked with different database access tools.
If you are working with SQL databases like MySQL you might be familiar with ORM (Object Relational Mapper) libraries like Sequelize, Typeorm, Query builders like Knex or native database drivers like mysql that will help to write raw SQL queries.
Each of these tools or methods have their own pros and cons.
I found out that among these tools Prisma is way more developer friendly.
In this article I will give a beginner walkthrough to Prisma and make you see how we can develop flexible & scalable backends.
What is Prisma?
Prisma is an open source next-generation ORM that allows you to easily manage & interact with your database.

Current Prisma release is comprised with 3 main parts
- Prisma Migrate: An imperative database schema migration tool.
- Prisma Client: An auto-generated and type-safe query builder.
- Prisma Studio: A visual editor for the data in your database.
Without further explaining let’s start building something, so the ideas behind Prisma will be much visible.
Let’s dive in
We will take a very basic blog post scenario into account, where a User creates a blog post.
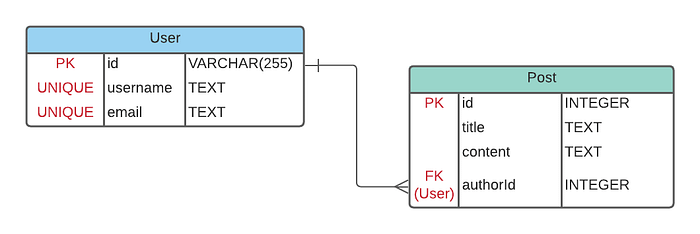
- For the sake of simplicity there are only 2 entities: User & Post.
- All data will be stored in a MySQL database.
- Features such as authentication are also discarded for simplicity.
A minimal TypeScript script for database querying will be built at the end.
If you need a guide on setting up MySQL on your development environment check out this in Prisma’s Data Guide.
All the code that you find over here can be found in the following repository. Its divided into separate branches for each topic covered in this article.
We will start off with a simple Typescript script & install Prisma first. You can find the starting code in 0-Initial-Script branch.
1. Setting up Prisma
First, we need to install Prisma as a development dependency so we can use Prisma CLI commands within the project.
$ npm install prisma --save-devYou can now invoke Prisma CLI within the directory by prefixing it with npx. Let’s initialize Prisma schema file with following command.
$ npx prisma init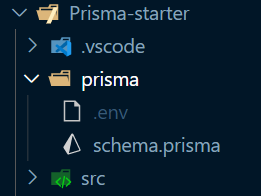
This will create a Prisma directory with a schema.prisma file and an .env file.
You can move this .env file to root i.e the same level as package.json.
Wait what’s Prisma Schema?
Prisma schema is the main configuration file in your Prisma setup. It serves as the source of truth for your database schema and the models in the application.
You can use Prisma schema to,
- Generate correct data source client code (Prisma Client). This acts as the query builder for your data.
- Generate migrations to update the database schema.
Prisma schema consist of following parts
- Data source : Defines the connection to data source.
- Generators : Defines what clients need to generated based on data model.
- Data model definition(s) : Your application model(s)
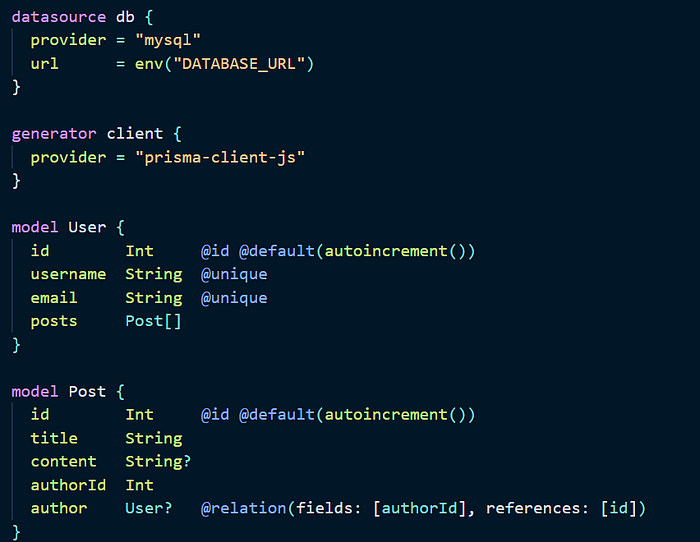
Default schema generated uses PostgreSQL as the provider. So, the first thing to do is to switch this to ```mysql```.
datasource db {
  provider = "mysql"
  url      = env("DATABASE_URL")
}
In order to connect to our database, url field needs to be changed. Instead of hardcoding this you can set it as an environment variable.
This needs to be specified in the following general format.
DATABASE_URL=mysql://USER:PASSWORD@HOST:PORT/DATABASE2. Creating database schema with migrations
With Prisma Migrate you can keep your Prisma schema in sync with your database schema. It can also aid you to maintain existing data in your database.
Let’s jump into changing Prisma schema suitable to our scenario. We can start writing our data model.
model User {
  id        Int     @id @default(autoincrement())
  username  String  @unique
  email     String  @unique
  posts     Post[]
}model Post {
  id        Int     @id @default(autoincrement())
  title     String
  content   String?
  authorId  Int
  author    User?   @relation(fields: [authorId], references: [id])
}
If this model seems a bit tedious & difficult to grasp the idea of how it will map into our database schema following visual representation will help you.
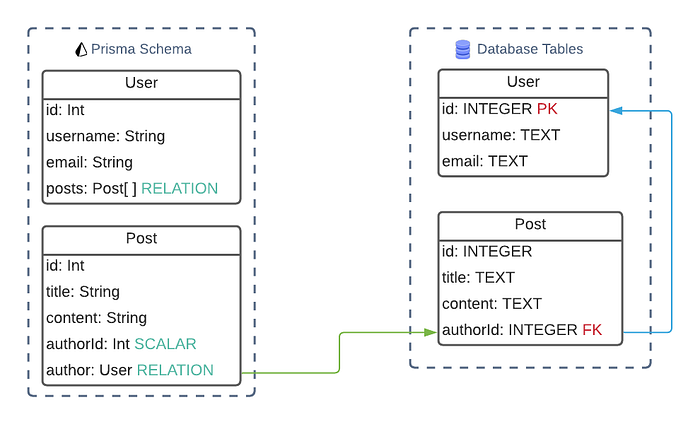
Our Prisma schema has several attributes that represent how table fields should be.
- @id — Primary keys
- @unique — Unique Keys
- @default — Default values
- @relation — Relationship between two tables
You can find more in detailed at attributes section of Prisma schema reference.
In order to generate migrations,
$ npx prisma migrate dev --name initThis will,
- Generate SQL migration file for this migration.
- Runs generated migration file against database.
- Generate Prisma client and update it in the package.json dependency list if not available.
If you need to make changes to your database schema all you have to do is make relevant changes to Prisma schema then run Prisma migration command.
If you have used TypeORM this process might be familiar. TypeORM can also automatically generate migration files with schema changes you make.
But the difference is, in TypeORM you need to manage separate Model files which maps with the migration files. With Prisma you only need to modify model(s) in Prisma Schema file.

We’ll dig deeper into database migrations with Prisma in a future article.
There are several more game changers in Prisma 🚀
3. Database Introspection
Prisma is capable of generating data model in Prisma schema for an existing database schema. This is done with Introspection.
Say you don’t want to use Prisma migration & you’re doing migration with plain SQL or any other migration tool. With Prisma you can re-introspect your database & re-generate Prisma schema then reflect these changes in your Prisma client (Which we’ll see ahead).
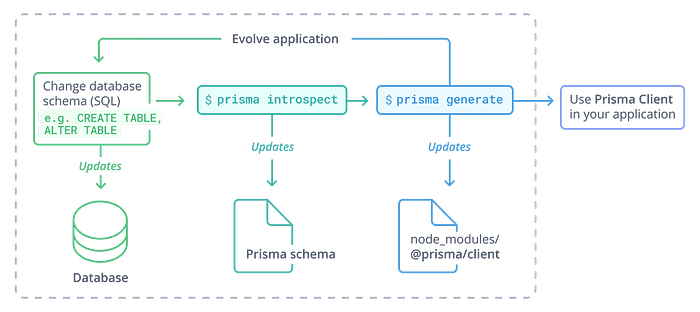
In this way you can gradually adopt Prisma to an existing application without making huge compromises.
4. Prisma Client
Prisma client plays the key part in writing your application logics. It’s an auto-generated type-safe query builder.
In case if Prisma client is not there in your package.json dependency list, its better to install @prisma/client package as a dependency.
npm install @prisma/clientWhenever Prisma schema is modified, you need to invoke prisma generate to reflect those changes in your Prisma client.
Let’s make the changes in the app.ts for querying data.
(P.S: In your console npm run serve will run the script)
First you need to import Generated Prisma client and create a Prisma object.
import { PrismaClient } from "@prisma/client";const prisma = new PrismaClient();
To create a user record
To create multiple posts
To create a User with post(s)
To query all users.
To find a user by email, but need only username & post titles.
Since the types are auto-generated based on the data model we defined in Prisma schema, every aspect from writing application logic to managing codebase is a lot easier. We don’t need to write any boilerplate code at all.
5. Seed Data
In some cases, as soon as we create our database schema, we need to update some database table(s) with records to work with. To do this we can seed our database.
Prisma has an integrated seeding functionality.

Currently, this is still a preview feature & not recommended to use in production environment.
This will be fully available in upcoming Prisma releases.
To make this work for now, first we’ll need ts-node & node types as dev dependencies.
npm install ts-node @types/node --save-devWe need to modify package.json script as below.
Seed file needs to be in same location as Prisma schema file. An example is given below.
To seed this data,
$ npx prisma db seed — preview-feature6. Prisma Studio

Prisma studio is a visual studio for the data in your database.
You can run it with,
$ npx prisma studioIn this way you will not probably need to integrate a database administration tool such as phpMyAdmin just to visualize your data.
Conclusion
Prisma has lots of features for an ORM & certainly makes the developers life easier.
Apart from the ones we’ve discussed there are many more powerful features that will be added in future ahead. Support for MongoDB & SQL Server, schema visualization are just few of them. You can view the plan ahead at Prisma Roadmap. Prisma also has a thriving developer community from all around the globe.
Hope this article has helped you in understanding the basic flows of Prisma & why it’s such a powerful tool for backend development. If you have any questions or feedback, comment down below.
Thanks for reading!
More content at plainenglish.io